
Soft Wash Siding: A Homeowner's Safe Cleaning Guide
Soft washing is the safest, most effective method for cleaning most residential siding, and the chemistry does the work, not the pressure. For vinyl, painted wood, fiber cement, and stucco, soft washing applies a diluted sodium hypochlorite solution at roughly 1–2% on-surface concentration, lets it dwell 10–15 minutes to kill algae and mold at the root, then rinses gently. The Power Washers of North America (PWNA) recognizes this chemistry-first approach as the standard for delicate exterior surfaces. Before you start, do two things: spot-test a small inconspicuous area, and protect every plant and electrical fixture nearby. If your home is taller than one story or you have any doubt about mixing chemicals safely, Capital Pro Pressure Washing is the local pro option for the Capital Region of New York.
Key Takeaways
Soft washing is the preferred siding cleaning method for most homes because chemistry kills biological growth at the root, delivering results that last 12–24 months versus 3–6 months for pressure-only cleaning.
| Point | Details |
|---|---|
| Soft wash beats pressure for siding | Low-pressure chemistry (1–2% SH on-surface) cleans without cracking panels or forcing water behind laps. |
| Test before you commit | Always spot-test an inconspicuous area and inspect caulking and seams before full application. |
| Dwell time is non-negotiable | Allow 10–15 minutes of contact time; never let the solution dry on painted or dark surfaces. |
| Know when to call a pro | Two-story homes, failing paint, roof cleaning, and any warranty-sensitive surface warrant a licensed contractor. |
| Capital Pro Pressure Washing | Veteran-owned, 10+ years in the Capital Region, licensed and insured, with a satisfaction guarantee on every soft-wash job. |
Table of Contents
- What is soft washing and why does it work on siding?
- Soft washing vs. pressure washing: which one is right for your siding?
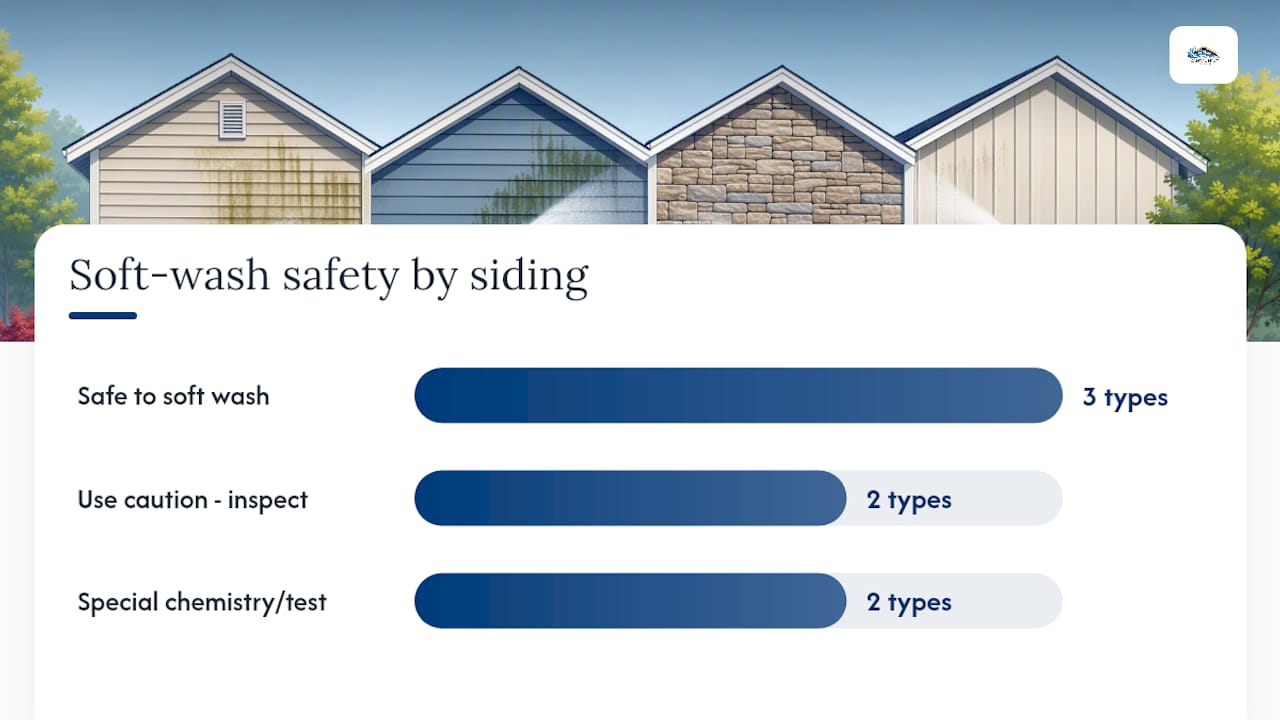
- Which siding materials are safe to soft wash?
- When should you soft wash your siding?
- What equipment and chemicals do you need for a safe soft wash?
- How to soft wash your siding step by step
- Common mistakes and safety precautions to know before you start
- How much does soft washing your siding cost?
- Should you DIY or hire a professional soft-wash service?
- Capital Pro Pressure Washing’s approach and what to expect
- An honest note from the Capital Pro team
- Ready to book a soft-wash inspection for your home?
- Sources
- FAQ
What is soft washing and why does it work on siding?
Soft washing is a low-pressure, chemistry-driven cleaning method where diluted bleach-based or oxygen-based cleaners do the actual cleaning, and water is only there to rinse. Most professionals apply the mix at 60–150 PSI, far below the 1,500–3,000 PSI common in pressure washing. The chemistry kills biological growth at the root rather than blasting it off the surface mechanically.
Three components make it work:
- Sodium hypochlorite (SH): The active biocide. On-surface concentration for vinyl siding typically targets 1–2%, achieved by downstream dilution of commercial 12.5% SH at roughly 7–10:1.
- Surfactant: Helps the solution cling to vertical surfaces, extends dwell time, and lifts dirt so the rinse carries it away cleanly.
- Dwell time: 10–15 minutes of contact time allows the chemistry to neutralize algae, mold, mildew, and lichen before rinsing.
Soft washing also protects delicate surfaces by preventing water intrusion behind panels, a real risk when high pressure is used on lap siding. The result is a cleaner surface that stays clean longer, because the organisms are dead rather than just displaced.
Soft washing vs. pressure washing: which one is right for your siding?
Homeowners often assume more pressure means a better clean. On siding, that assumption usually causes damage. High PSI and narrow nozzles can crack vinyl panels, blow out caulk, and force water into wall cavities where it causes hidden moisture damage. Chemistry is the faster, longer-lasting approach for most exterior walls.
| Feature | Soft Washing | Pressure Washing |
|---|---|---|
| Operating pressure | 60–150 PSI (application) | 1,500–3,000+ PSI |
| Cleaning mechanism | Chemistry (SH + surfactant) | Mechanical force |
| Risk to vinyl/painted wood | Very low when done correctly | High — cracking, panel lift, water intrusion |
| Results longevity | 12–24 months | 3–6 months (regrowth common) |
| Best surfaces | Vinyl, painted wood, fiber cement, stucco, EIFS, roofs | Concrete, brick, pavers, masonry |
| Water intrusion risk | Low | High on lap siding |
Pressure washing still makes sense on concrete driveways, heavily soiled pavers, and certain masonry where mechanical force is needed and water intrusion is not a concern. For roofs and shingles, check manufacturer guidance first. Most asphalt shingle warranties explicitly require low-pressure cleaning methods, and voiding that warranty with a pressure washer is an expensive mistake.
When soft washing is clearly the right call:
- Vinyl siding with black or green streaks
- Painted wood or fiber cement with mildew staining
- Stucco or EIFS (Exterior Insulation and Finish Systems) where high pressure can crack the finish
- Any surface where you want results that last longer than one season
Which siding materials are safe to soft wash?
Most common siding types handle soft washing well, but a few need extra attention.
- Vinyl siding: The ideal candidate. Soft washing removes biological growth without risking the cracking or panel lift that pressure washing causes. Manufacturers often recommend low-pressure cleaning methods specifically.
- Fiber cement (HardiePlank and similar): Safe for soft washing. Avoid high pressure near cut edges where moisture can penetrate.
- Painted wood: Soft washing works well on sound paint. If the paint is peeling, flaking, or chalky, the chemistry can accelerate paint failure. Inspect before you start.
- Aluminum siding: Generally safe, but oxidized aluminum develops a chalky white residue that standard SH solutions won’t fully restore. Oxidation-specific cleaners are needed for that problem.
- Stucco and EIFS: Soft washing is appropriate, but these surfaces are porous and prone to water intrusion. Keep application pressure low and inspect all cracks and seams before cleaning.
- Brick: Traditional hard brick handles soft washing well. Historic brick with lime mortar is a different story. Lime mortar is softer and can be damaged by acidic cleaners or even mild SH concentrations. Test carefully and consult a mason if the home is older.
- Composite siding: Most composite products are safe for soft washing. Check the manufacturer’s care guide for chemical restrictions.
One universal rule: always inspect caulking and seams before you start. Gaps or failing caulk let water behind the wall regardless of how low your pressure is. Soft washing won’t fix a staining problem caused by chalky oxidation or a degraded finish either. Those need specialty chemistry.
Pro Tip: Pick a small, inconspicuous area near a corner or behind a bush for your test patch. Apply the diluted solution, wait 10 minutes, rinse, and check for color change, paint lift, or surface reaction before committing to the full house.
When should you soft wash your siding?
The clearest sign is visible: black or green streaks running down from the roofline or gutters. Those are algae and mildew colonies, not just dirt, and they won’t come off with a garden hose.
Watch for these specific indicators:
- Black streaks or green tinting on north-facing or shaded walls
- Fuzzy or powdery growth on the surface (lichen or mold)
- A musty or earthy smell near the foundation or under eaves
- Accelerated staining on walls shaded by trees or overhangs
- Visible dirt accumulation in the horizontal grooves of lap siding
- Discoloration that returns within a few months of a previous cleaning
For most homes, a 12–24 month cleaning cycle is realistic. Soft washing kills organisms at the root, so results last considerably longer than a pressure-only rinse, which can see regrowth in as little as 3–6 months. Several site factors shorten that interval: heavy tree canopy, high humidity, proximity to a pond or stream, and splash-back from soil or mulch beds near the foundation. North-facing walls in shaded yards may need attention every 12 months, while a south-facing wall in full sun might go 24 months between cleanings.
What equipment and chemicals do you need for a safe soft wash?
Essential equipment
- Soft-wash pump (12V pump sprayer) or a downstream injector attached to a pressure washer
- Appropriate nozzles: 25° or 40° fan tips for rinsing, soap/low-pressure tip for application
- Chemical-resistant hose rated for SH contact
- Extension wand or telescoping lance for reaching upper panels without a ladder
- Ladder (if needed) rated for your weight plus equipment
- Garden hose and water source for pre-wetting plants and rinsing
PPE checklist
- Chemical-resistant gloves (nitrile or neoprene)
- Safety goggles or a face shield
- Chemical-resistant clothing or a Tyvek suit
- Respirator when mixing concentrated SH (12.5%)
- Closed-toe shoes
Chemicals
Because downstream injectors dilute at roughly 7–10:1, running undiluted 12.5% SH in the tank lands the on-surface concentration in the target 1–2% range for vinyl siding. A surfactant (dish soap works for small DIY jobs; professional-grade surfactants like EaCo Chem’s products are used commercially) is added to improve cling and dwell.
Oxygen-based alternatives, such as sodium percarbonate, are gentler and biodegradable. They work well on light organic staining but are less effective against heavy algae or mold colonies than SH-based mixes. Many biodegradable surfactant formulations are available for homeowners who want to minimize chemical runoff near gardens or water features. For mildew stain removal on other delicate exterior surfaces, the same principles apply: gentle chemistry, proper dwell time, and a thorough rinse.
Pro Tip: Never mix sodium hypochlorite with ammonia-based cleaners, acidic cleaners, or vinegar. The combination produces toxic chloramine or chlorine gas. Mix chemicals in a well-ventilated area and always add SH to water, not water to SH.
How to soft wash your siding step by step
- Shut off power to exterior outlets and light fixtures. Water and electricity near siding seams are a serious hazard.
- Pre-wet all plants, shrubs, and grass within 10 feet of the work area. Saturated soil and foliage absorb less chemical if overspray lands on them.
- Cover electrical outlets, light fixtures, and any open vents with plastic sheeting or painter’s tape.
- Mix your solution. For a downstream injector setup, fill the tank with 12.5% SH and surfactant. For a pump sprayer, dilute to approximately 1–2% SH on-surface.
- Do a test patch on an inconspicuous section. Wait 10 minutes and inspect before proceeding.
- Apply bottom-up. Starting from the bottom prevents streaking from solution running down over dry, dirty siding. Keep the nozzle 12–18 inches from the surface.
- Allow 10–15 minutes of dwell time. Watch the surface. You should see biological growth change color (from green/black to brown or white) as the chemistry works.
- Rinse top-down with a 25° or 40° fan tip. Keep the nozzle angled downward to avoid forcing water under lap joints. Maintain a 6–18 inch standoff distance.
- Inspect and spot-treat. Check for missed areas, stubborn staining, or sections where growth didn’t fully clear. Apply a second pass if needed.
- Rinse plants again after finishing each wall section.
Pro Tip: In direct sun or temperatures above 80°F, the solution can dry on the surface before the dwell time is complete. Re-mist treated sections every few minutes to keep them wet. Work in the shade when possible, moving around the house to follow the shadow.
Stop and call a professional if you encounter: walls taller than one story that require ladder repositioning, paint that is visibly failing or peeling, any sign of water already getting behind the siding, or roof/soffit areas where water intrusion risk is high.
Common mistakes and safety precautions to know before you start
The most expensive DIY mistake is using a zero-degree or 15-degree nozzle on siding. That concentrated stream can crack vinyl, strip paint, and punch water directly behind panels. Always use a 25° or 40° fan tip for rinsing siding.
Never let an SH-based solution dry on painted or dark-colored surfaces. Drying before rinsing can cause irreversible staining or pigment oxidation. Keep the treated surface wet, work in sections, and rinse promptly. On hot days, this is the single most common cause of chemical damage to siding.
Additional precautions worth taking seriously:
- Pre-wet all vegetation before applying solution and rinse it again after each wall section
- Use biodegradable surfactants near garden beds, water features, or storm drains
- If runoff will reach a storm drain, check local ordinances. Some municipalities regulate chemical discharge.
- Never work alone on a ladder. Have a spotter on the ground.
- Keep a garden hose running nearby for immediate rinsing if solution contacts skin or eyes
- Do not mix bleach with any other cleaning chemical
Pro Tip: Cover air conditioning units and any exposed wiring conduit with plastic sheeting before you start. SH solution that pools inside an AC unit can corrode the coils.
How much does soft washing your siding cost?
Residential soft washing in the U.S. typically runs $150–$700 for a standard home, with the wide range driven by several variables. A 2,000 sq ft single-story home with light algae staining sits toward the lower end of that range. Add a second story, heavy mildew, or bundled services and the price climbs.
| Cost Driver | Effect on Price |
|---|---|
| House size (sq ft) | Larger footprint = more chemical, more time |
| Number of stories | Two-story adds ladder/lift time and safety complexity |
| Severity of growth | Heavy mold or lichen requires stronger mix and longer dwell |
| Siding type | Stucco and EIFS require extra care and slower application |
| Add-on services | Gutter cleaning, window cleaning, and roof washing each add cost |
| Travel/access | Remote locations or difficult site access may carry a surcharge |
Time-wise, a single-story 2,000 sq ft home typically takes 2–4 hours from setup to final rinse for an experienced crew. A two-story home or one with heavy biological growth can run 4–6 hours. DIY time is longer because of equipment setup, chemical mixing, and the learning curve on nozzle technique.
Soft washing costs more upfront than a basic pressure rinse, but the result window lasts considerably longer than pressure-only cleaning, making it more cost-effective over a multi-year maintenance schedule.
Should you DIY or hire a professional soft-wash service?
When DIY is reasonable
- Single-story home with accessible walls
- Light to moderate algae or mildew staining
- You are comfortable mixing diluted chemicals safely
- You have or can rent a 12V pump sprayer or downstream injector
- No warranty restrictions on your siding or roofing materials
When to hire a professional
- Two-story or taller: Ladder work with chemical equipment is a genuine fall risk. Professionals use extension wands and lift equipment.
- Roof cleaning: Most shingle manufacturers require low-pressure cleaning and some void warranties if a non-certified contractor performs the work.
- Failing paint or fragile finishes: A professional can assess whether the surface will tolerate cleaning chemistry before committing.
- Mold suspected inside walls: Surface cleaning won’t solve an internal moisture problem. A pro can identify signs of deeper issues.
- No insurance: If you damage a neighbor’s property or injure yourself, DIY has no coverage. Licensed and insured contractors carry liability protection.
Questions to ask any contractor before booking:
- Are you licensed and insured in New York (or your state)?
- What SH concentration do you apply on-surface, and how do you verify it?
- What surfactant do you use, and is it biodegradable?
- How do you protect landscaping and manage runoff?
- Can you show before/after photos from similar homes?
- Do you offer a satisfaction guarantee?
A contractor who can’t answer questions 1, 2, and 3 clearly is not worth hiring. For siding installation or replacement needs that come up during a cleaning inspection, a qualified siding contractor should be consulted separately.
Capital Pro Pressure Washing’s approach and what to expect
Capital Pro Pressure Washing is a veteran-owned company with over 10 years of experience serving homeowners across New York’s Capital Region. Every soft-wash job follows a consistent process:
- Initial inspection: Identify siding material, note failing caulk, seams, or paint, and flag any areas that need special handling.
- Material-specific chemistry: Calibrate on-surface SH concentration to the siding type. Vinyl gets the standard 1–2% mix; more delicate finishes get a lower concentration or an oxygen-based alternative.
- Spot testing: Every job includes a test patch before full application.
- Controlled application: Bottom-up application with appropriate standoff distances, surfactant for dwell, and active monitoring to prevent solution drying.
- Post-clean inspection: Walk the perimeter with the homeowner to confirm results and flag any areas for follow-up.
Capital Pro Pressure Washing is licensed and insured, and every job carries a satisfaction guarantee. The team uses biodegradable surfactants and manages runoff actively on every property.
[Before/after photos and customer testimonials are available on the Capital Pro Pressure Washing website.]
An honest note from the Capital Pro team
We have cleaned hundreds of homes across Albany, Delmar, Saratoga Springs, Troy, and the surrounding Capital Region, and the call we dread most is the one that starts with “I tried it myself first.” Soft washing done right is genuinely safe and effective. Done wrong, it strips paint, damages caulk, and leaves chemical residue on landscaping. Our team uses calibrated chemistry, proper PPE, and a post-clean walkthrough on every job because we stand behind the results. If you are unsure whether your siding is a good candidate for soft washing, reach out for a free inspection. We would rather spend 20 minutes looking at your home than have you spend a weekend undoing a mistake.
Ready to book a soft-wash inspection for your home?
Capital Pro Pressure Washing gives homeowners across New York’s Capital Region a professional alternative to weekend DIY risk. The house washing service covers full exterior soft washing with calibrated chemistry, biodegradable surfactants, and a satisfaction guarantee. No guesswork on chemical ratios, no ladder risk, and no damage to your landscaping.
Veteran-owned and locally operated, Capital Pro Pressure Washing has served the Capital Region for over 10 years with licensed, insured crews who know the difference between a surface that needs a standard soft wash and one that needs a gentler approach. Homeowners commonly bundle gutter cleaning and exterior window cleaning into the same visit for a complete exterior refresh. Request a quote at Capitalpropressurewashing or call to schedule your inspection.
Sources
- What Is Soft Washing? – Softwash Technologies
- Pressure Washing Vinyl Siding: Complete Operator Guide · MakeWash
- Is soft washing safe for vinyl siding? | Homeowner’s Guide
- How Much Does It Cost to Soft Wash a House? Complete Guide
- How to Soft Wash a House Like a Pro — Window Hero
Consult your siding or roofing manufacturer’s care guide before cleaning, particularly for fiber cement and asphalt shingles, where warranty terms often specify approved cleaning methods.
FAQ
Can you soft wash vinyl siding?
Yes. Soft washing is the recommended method for vinyl siding.
How much does it cost to soft wash a 2,000 sq ft house?
Typical U.S. costs run $150–$700 for a standard residential home, with a 2,000 sq ft single-story home toward the lower end of that range. A second story, heavy mildew, or bundled services like gutter cleaning push the price higher.
Is soft washing worth the money compared to pressure washing?
For siding, yes. Soft washing results typically last 12–24 months because the chemistry kills organisms at the root, while pressure-only cleaning can see regrowth in 3–6 months. The longer interval makes soft washing more cost-effective over a multi-year maintenance schedule.
What is the best chemical for soft washing siding?
Oxygen-based alternatives like sodium percarbonate work for light staining but are less effective against heavy mold or algae.
Recommended
Services Related To This Article
Need a quote in the Capital Region?
Fast, free estimates from a local, licensed & insured team.
